Skip to product information

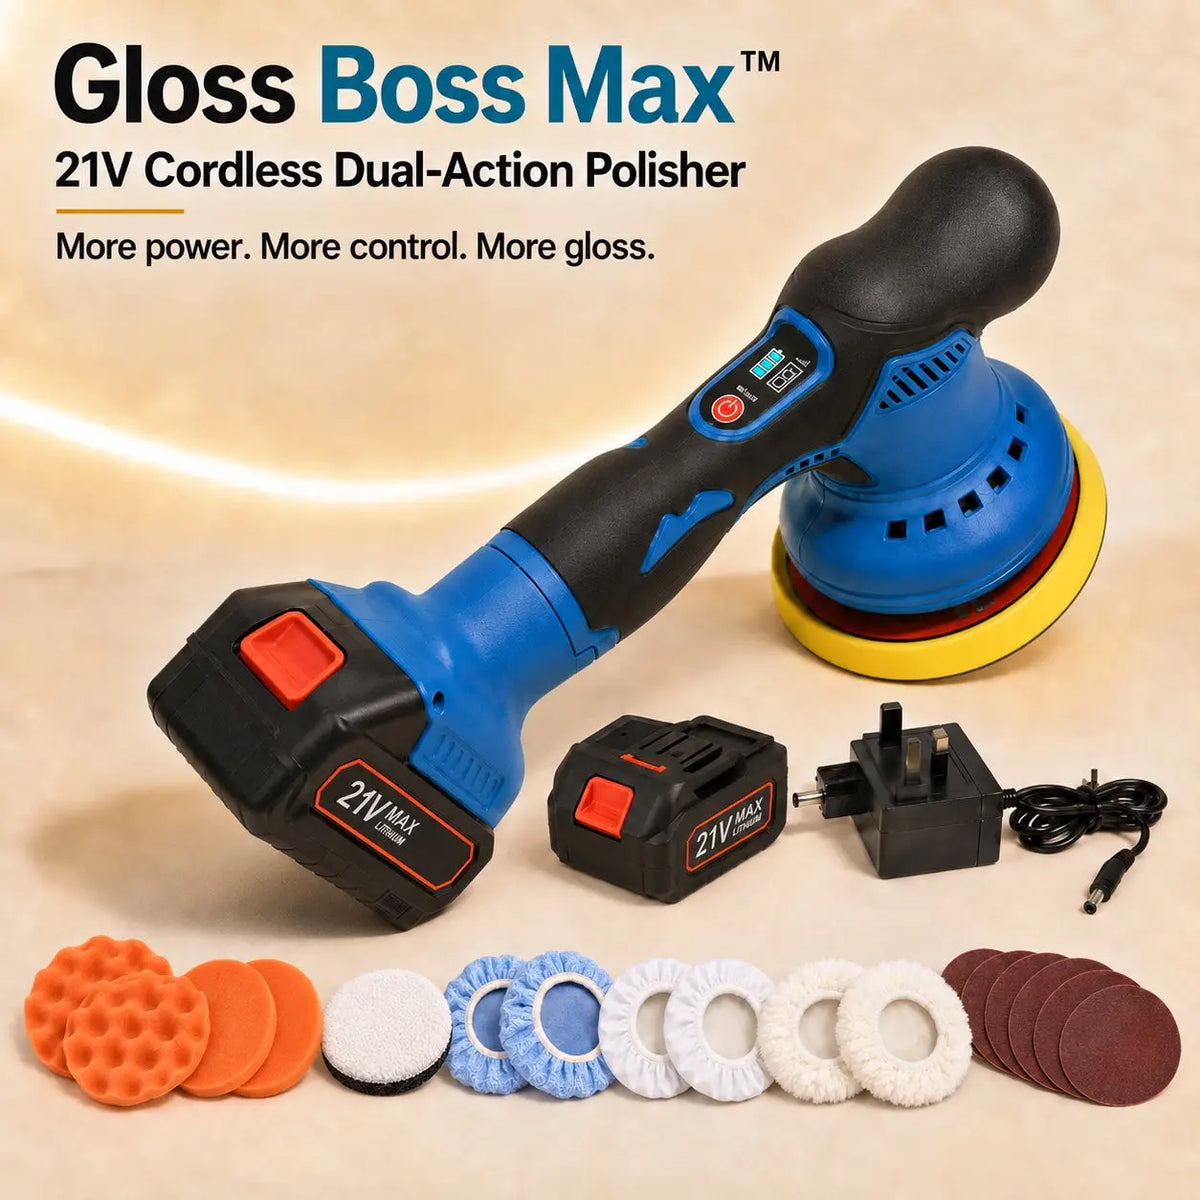
Gloss Boss Max™ 21V Cordless Car Polisher Kit

Gloss Boss Max™ 21V Cordless Car Polisher Kit

Regular price £44.99
Batteries

🪞 Bring back deeper gloss and clearer reflections at home

⚡ 380W motor with 8 digital speed levels

🌀 9mm dual action helps reduce localised heat build-up

🔋 Choose 1 or 2 removable 21V Max 2.0Ah batteries

🪶 Approx. 1.2kg with balanced two-hand control

🚚 Free tracked UK shipping, dispatched within 24 hours

✅ 30-day satisfaction guarantee

Order today and get it between [start_date] and [end_date].

  • Apple Pay
  • Google Pay
  • Meta Pay
  • Klarna
  • Maestro
  • Mastercard
  • PayPal
  • Shop Pay
  • Visa
Premium QualityExcellence in Every Detail
Trusted BusinessTrusted by Thousands of Customers
Express ShippingFast Delivery with No Extra Costs
Returns AcceptedMake Returns with Ease
Secure CheckoutSecure Payment for Peace of Mind

How to use your Gloss Boss Max™

A good finish starts here

  • Prepare. Charge your battery, or both if you chose the two-battery kit. Wash and dry the car; work on cool paint (in the shade on hot days).
  • Start gently. Test a small area with an orange foam pad and polish.
  • Spread, then polish. Start at digital level 1–2 to spread, then increase gradually. Keep the pad flat and moving with light pressure.
  • Check and protect. Switch off on the paint, wipe and inspect. Finish with wax or sealant.
Follow the 10 steps

What you'll need

  • A machine polish (also sold as a finishing polish or finishing compound) that says it suits dual-action or machine use. We suggest Farécla G10. All-in-one 'polish and wax' products remove less.
  • A cutting compound, only if a test section shows the marks need more. We suggest Farécla G3 Premium, followed by G10.
  • A wax or sealant to protect the paint afterwards.
  • Several clean microfibre cloths. Keep a fresh one for the final wipe.
  • Car shampoo, a wash mitt, two buckets and a drying towel.
  • Low-tack masking tape for rubber seals, plastic trim and badges.
  • A torch, so you can see the swirls properly.
  • A shady spot to work, and a mains socket for the charger.
  • Optional: a clay bar with clay lubricant, eye protection and gloves.

Choose your pad

Your 16-piece set includes 2 flat foam pads, 2 wave foam pads, 1 wool disc, 4 cloth bonnets, 2 fluffy finishing bonnets and 5 sanding discs. Start with foam; keep a separate pad for each product.

  • Orange wave foam pad included with Gloss Boss Max, showing the raised foam texture.

    Orange wave foam · 2 pads

    Raised, wavy foam for polish or compound. Start with polish on a test patch; use compound only if the marks need more. Keep one pad for each product.

  • Orange flat foam pad included with Gloss Boss Max, showing the smooth working surface.

    Orange flat foam · 2 pads

    Smooth foam for polishing and spreading wax or sealant. Keep a clean one just for wax, and use a low digital level.

  • White short-pile wool disc with black backing included with Gloss Boss Max.

    White wool disc · 1

    The white disc with a black backing is for polishing and buffing after waxing. It attaches flat to the backing plate. Start gently on a small test patch.

  • Three bonnet types supplied with Gloss Boss Max: blue cloth, smooth white cloth and fluffy white finishing. Two of each are included.

    Waxing & finishing bonnets · 6

    Four cloth covers (two blue, two smooth white) for waxing, plus two fluffy white covers for finishing. Fit them snugly over a foam pad and use a low level. The photo shows one of each type.

  • Brown abrasive sanding disc supplied with Gloss Boss Max for specialist surface preparation.

    Brown sanding discs · 5

    Abrasive discs for specialist surface preparation by experienced users. No task in this polishing guide needs them.

Sanding discs are not for polishing. They can remove the clear coat if used wrongly. If you're new to this, leave them aside. Never use them on headlights, glass, chrome, trim or rubber.

Pads worn out? Gloss Boss™ Replacement Pad Set

Set your speed

The Max has eight digital levels, shown on its display. Start at 1–2 and increase only after testing. These are starting points, not fixed settings for every paint or product; follow the supplied manual and polish instructions.

  • Levels 1–2

    Spread polish, apply wax or sealant, or lightly buff with a clean finishing bonnet.

  • Levels 3–4

    A starting point for polishing with foam. Check your test patch before increasing the level.

  • Levels 5–6

    Stronger correction, only when the test patch needs it and the product instructions allow. Keep moving with light pressure.

  • Levels 7–8

    The highest settings. They aren't needed for every job. Use only when the manual, product and test patch support it; stay off edges and check for heat.

Step by step

  1. Step 1: Charge your battery

    The Max comes with one or two 21V Max 2.0Ah batteries, depending on your order. Fully charge each battery before starting, using the supplied UK mains charger indoors, somewhere dry. Follow the manual and charger indicators.

    Keep in mind Listed charging time is about 30–50 minutes, with up to about 60 minutes of use per battery. Actual times vary with conditions, speed and pressure. Work panel by panel.

  2. Step 2: Prepare the car

    Wash and fully dry the car, then park in the shade and wait until the panels feel cool. Tape over rubber seals, plastic trim, badges and sharp edges with low-tack tape. Shine a torch across the paint to see what you're working with.

    Keep in mind Slip your hand into a thin plastic bag and stroke the paint. If it feels gritty, clay it first with a clay bar or mitt and plenty of clay lubricant.

  3. Step 3: Fit a pad

    With the battery removed, centre an orange foam pad on the Max's 145mm hook-and-loop plate. Press it flat and gently tug the edge to check it holds. To change pads, switch off, remove the battery and peel from one edge.

    Keep in mind Give each product its own pad, so compound, polish and wax never mix.

  4. Step 4: Fit a battery

    With the tool switched off, slide a charged 21V Max battery into its mount until it locks in place. Don't force it. It should stay secure without being held; if it doesn't, remove it and refit it.

    Keep in mind Press the battery release catch to slide it out. Use the battery and charger supplied for the Max; don't assume the original Gloss Boss's 12V batteries fit.

  5. Step 5: Read the digital controls

    Find the on/off control, digital speed number and battery-status indicator on the handle. The Max has eight levels, not the original model's six-speed wheel. Check the supplied manual for how to change levels, and start at level 1.

    Keep in mind Keep your hands off the vent slots on the head while it's running.

  6. Step 6: Make your first section a test

    Pick a flat part of a panel, about 40 × 40cm, where you can see well. Start with your gentlest setup: an orange foam pad and polish, not compound. Only step up to compound or a higher speed if the swirls are still there after three or four rounds.

    Keep in mind Stepping up means a stronger product or a higher speed, not more pressure. You can always take more off, but you can't put lacquer back.

  7. Step 7: Spread the polish on a low digital level

    On a new pad, work a little polish into its face with a clean finger first. Put three or four pea-sized drops on the pad and, with the tool off, dab the pad onto the paint in a few spots across the section. Set digital level 1 or 2, rest the pad flat, switch on and spread the polish evenly.

    Keep in mind Switching on in the air flicks polish everywhere. Start and stop with the pad on the paint.

  8. Step 8: Polish with slow, overlapping passes

    Start your working passes around digital level 3–4, unless your polish instructions say otherwise. Hold the head and handle, keep the pad flat and use light pressure. Move about a hand-width every couple of seconds, side to side and then up and down, overlapping each pass by half.

    Keep in mind Watch the edge of the pad: it should keep turning, not just buzz. If it only buzzes, you're pressing too hard, so ease off.

  9. Step 9: Wipe off and check

    Switch off with the pad still on the paint, then lift it away. Wipe off the residue with a clean microfibre cloth. Check under a torch from a few angles, and do another round if you need to.

    Keep in mind One round is one set of side-to-side and up-and-down passes. Three or four rounds on a section is normal. For the next section, add two or three fresh drops and overlap the last one slightly.

  10. Step 10: Protect the paint

    Polishing corrects the paint but doesn't protect it. Spread a thin coat of wax or sealant on digital level 1 with a clean flat foam pad kept for wax, or by hand. Let it haze as the product's instructions say, then buff it off with a clean microfibre cloth.

    Keep in mind Thin coats work best. More wax isn't more shine.

What to avoid

Any polisher can mark paint if it's misused. The dual-action head is gentler than a rotary polisher, and these habits lower the risk further.

  • Don't press hard. A light touch lets the pad turn and do the work.
  • Don't hold the pad still in one spot or tip it onto its edge. Keep it moving and flat.
  • Stay off sharp body lines and panel edges, where the paint is thinnest. Work around badges and rubber.
  • Don't polish in direct sun or on a warm panel. The product dries and smears.
  • Don't polish over dirt. Wash and dry first, or you'll grind it into the paint.
  • Don't polish over peeling or flaking lacquer or bare metal. It makes them worse.
  • Don't machine polish matt or satin paint, or matt wraps. It leaves shiny patches that can't be undone.
  • With resprayed paint, wraps or protection film, check with whoever applied it first. On very old paint, test a small hidden patch, and if colour comes off onto the pad, stop and get in touch.
  • Don't use the sanding discs for polishing.
  • Keep the tool, batteries and charger away from rain, buckets and hoses.

Troubleshooting

It feels like it has no power

Ease off: pressing hard can stop a dual-action pad turning, leaving only a buzz. Keep it flat and watch that the edge turns. Check the digital level and battery status. Recharge if needed, or swap to a charged spare if you have one.

It won't start or cuts out

Check the battery-status display and charge the battery if needed. Switch off, remove it, check the mount is clear and refit it without forcing. If you have a second charged battery, try it. If the Max still won't run, contact us with your order number.

The battery runs down before I've finished

High digital levels and heavy pressure use charge faster. Start with a full battery and keep a light touch. With the two-battery kit, swap at the end of a panel. With one battery, plan a charging break. The stated runtime is a maximum, not a guarantee for a full car.

A battery won't charge

Check the charger is plugged in and switched on at the wall, and the battery is connected properly. Use the supplied Max charger. If you have a second battery, try it to help identify the fault. Still no charge? Contact us with your order number.

Polish flies off, dries hard or leaves haze

Use three or four pea-sized drops, and start and stop with the pad on the paint. Work in the shade on a cool panel and wipe off soon after each section. If it still looks smeary, wipe with a clean microfibre and do another light pass.

A foam pad is breaking up or has gone hard

Usually it's heat from heavy pressure, a dry or clogged pad, or staying in one spot. Keep it moving with light pressure, add a drop of product, and clean or swap pads between stages. Replace any pad that's torn or won't grip.

The swirls or a scratch are still there

Wipe the panel and check under a torch, as residue can hide the result. Do a few more light passes, then try compound if you need to. If a scratch catches your fingernail, polishing may soften it but not remove it, so don't keep going over one spot.

Aftercare

  • Switch off and take the battery out before cleaning, changing pads or putting it away.
  • Clean the pads after each session in warm water with a little mild soap, unless the manual says otherwise. Rinse, squeeze gently and let them air-dry, away from radiators.
  • Wipe the tool with a dry or barely damp cloth. Keep water away from the vents.
  • Store the pads clean and flat somewhere clean and dry, so the foam keeps its shape.
  • Keep the batteries and charger indoors, somewhere dry and not too hot or cold.
  • Replace pads that are torn, gone hard or won't grip. Tired pads give a tired finish.

Use the Max on suitable car paintwork, headlights, smooth polished metal, finished wood and worktops. Each surface needs its own product. Test a small hidden area first and keep separate pads for the car and home.

  • Gloss boost after a wash

    For clean paint that looks flat or tired. A light polish can bring back some depth and gloss. Follow steps 2 to 10.

    Pad
    Orange foam pad
    Speed
    1–2 to spread, 3–4 to polish
    Use with
    A fine polish such as Farécla G10, then wax or sealant

    Wash, dry and mask the trim first, and work on a cool panel.

  • Fine swirls and water spots

    The fine circular marks you notice in sunlight, and marks left by dried water. Start with polish and step up only if they stay.

    Pad
    Orange foam pad
    Speed
    3–4
    Use with
    Polish. Compound only if a test patch needs it

    It may take several passes. Water spots etched into the paint may not fully come out.

  • Heavier swirls and light scratches

    For marks polish alone didn't shift. Start with compound on orange foam, then refine with polish on a fresh pad. Test on a small area first.

    Pad
    Orange foam: one for compound, a fresh one for polish
    Speed
    1–2 to spread; start at 3–4, increase gradually only after testing; return to 3–4 to refine
    Use with
    A cutting compound such as Farécla G3 Premium, then G10, then wax

    If a scratch catches your fingernail, it may soften but not disappear. Stay off edges.

  • Waxing and sealing

    Spreads a thin, even coat of wax or sealant, one panel at a time, ready to buff off.

    Pad
    Clean flat foam pad or towel waxing bonnet
    Speed
    1
    Use with
    Wax, sealant or a ceramic spray, then a microfibre to buff

    Keep this pad for wax only, and follow the product's own timing.

  • Hazy headlight lenses

    Plastic lenses go dull and hazy with age. Clean and dry the lens, then use the same spread, polish and wipe steps as on paint, with two pea-sized drops. A headlight polish can improve light haze, but heavy yellowing or cracking may need a dedicated restoration kit.

    Pad
    A clean orange foam pad kept for headlights
    Speed
    1–2 to spread, 3–4 to polish
    Use with
    Headlight polish, then a UV sealant applied as its instructions say

    Mask the paint around the lens. Light pressure and keep moving: plastic warms up faster than paint. Never use the sanding discs on a lens.

  • Metal

    For bringing some shine back to dull, smooth, polished metal. Not for brushed metal, such as most stainless-steel appliances and sinks: the circular motion can spoil the brushed grain. Metal polish turns pads dark, so keep one just for metal.

    Pad
    An orange foam pad kept just for metal
    Speed
    1–2, then 3–4 if needed
    Use with
    A metal polish made for that metal

    Test a hidden spot first. Plated or coated metal can wear through, and chrome-effect plastic isn't metal.

  • Wood and worktops

    For buffing wax or polish evenly into finished wood, or a worktop polish across a kitchen worktop.

    Pad
    Clean foam reserved for home use; a finishing bonnet to buff
    Speed
    1–2
    Use with
    Wood wax or polish, or a food-safe product made for your worktop

    Check the care advice first: some surfaces shouldn't be machine polished. Keep off edges and thin veneer, test a hidden spot, and don't use it on antiques or French-polished furniture.

  • Not for: deep scratches, chips and rust

    Polishing works on the top layer of the paint. Scratches through to the primer or metal, rust and peeling lacquer need touch-up paint or a bodyshop, not more polishing.

Need a hand? Contact Verono with your order number and a photo of the issue.

Description

A professional detailer can charge £100 or more for one visit. Gloss Boss Max™ is designed to help you bring back depth, clarity and gloss on your own driveway whenever your paint starts looking tired.

More power. More control. More gloss.

The upgraded 380W motor works across eight digital speed levels from approximately 2,800 to 5,500 rpm. Start low to spread wax or polish, then move up gradually to suit the pad, product and paint condition.

Beginner-friendly by design.

The 145mm pad rotates and oscillates on a 9mm eccentric orbit. This spreads contact, pressure and heat across a wider path than a straight-axis rotary, helping reduce localised heat build-up and making the machine more forgiving for first-time users. Keep the pad flat, use light pressure and keep it moving.

Choose the battery kit that suits you.

Choose one 21V Max 2.0Ah battery for occasional jobs or the two-battery kit for longer sessions and a ready spare. Each battery provides up to approximately 60 minutes of use and recharges in around 30–50 minutes. Runtime varies with speed, pressure and surface condition.

A pad for every stage.

The 16-piece pad and prep set includes 2 orange flat foam pads, 2 orange wave foam pads, 1 white wool disc, 4 cloth waxing bonnets (2 blue and 2 smooth white), 2 fluffy white finishing bonnets and 5 brown sanding discs. Use foam for polish or wax and the wool disc for polishing after waxing. Sanding discs are for specialist surface preparation, not everyday polishing.

What's Included

  • 1 × Gloss Boss Max™ cordless dual-action polisher
  • 1 × 21V Max 2.0Ah rechargeable battery
  • 1 × Extra 21V Max 2.0Ah rechargeable battery (2 Batteries Included option only)
  • 1 × UK mains battery charger
  • 2 × orange flat foam pads
  • 2 × orange wave foam pads
  • 1 × white wool disc with black backing
  • 4 × cloth waxing bonnets (2 blue, 2 smooth white)
  • 2 × fluffy white finishing bonnets
  • 5 × brown sanding discs
  • 1 × Verono 30-Day Satisfaction Guarantee

Specification

  • Type: Cordless dual-action eccentric car polisher and buffer
  • Motor: 380W
  • Speed: 8 digital levels, approximately 2,800–5,500 rpm no-load
  • Orbit: 9mm eccentric movement
  • Polishing plate: 145mm / approximately 6 inch
  • Battery options: 1 or 2 × 21V Max 2.0Ah lithium-ion batteries
  • Runtime: Up to approximately 60 minutes per battery
  • Charging: Approximately 30–50 minutes with the supplied UK mains charger
  • Tool weight: Approximately 1.2kg
  • Approximate size: 31 × 14.5 × 16cm
  • Accessories: 16-piece pad and surface-preparation set
  • Warranty: 30-day satisfaction guarantee

Runtime, charging time and results vary with speed, pressure, technique and surface condition.

Shipping

Every order ships from the UK with tracking, and we take real pride in getting it to you quickly.

Shipping times

  • Orders are dispatched within 24 hours.
  • Free tracked UK delivery, arriving within 2–4 business days.
View full details

Gloss Boss Max™ 21V Cordless Car Polisher Kit

Regular price £44.99

Your paint is not finished. It is hiding under haze.

Fine wash swirls, water spots and oxidation scatter the light, leaving even a clean car looking flat. Gloss Boss Max™ combines a 380W motor, eight digital speed levels and a forgiving 9mm dual action to help restore richer colour and clearer reflections with the right pad and product.

Bring Back The Gloss In 4 Steps

1

Wash and dry the panel

Get the surface properly clean and dry first, so you are polishing paint and not grit.

2

Add polish

Add a few small dabs of a suitable compound, polish or wax to the correct foam pad.

3

Pick your speed

Start on a low digital level to spread the product, then increase gradually for the working passes.

4

Glide, then buff

Guide the pad slowly with light pressure, then wipe the panel with a clean microfibre cloth.

Keep the pad flat and moving. Work a small test area first and use the least aggressive pad and product that achieves the result.

Why Dual Action Is More Forgiving

Straight-axis rotary

Follows one fixed circular path, concentrating contact and heat in a smaller area if technique slips.

Gloss Boss Max™ 9mm dual action

Rotates and oscillates to spread contact, pressure and heat across a wider path.

Designed with first-time users in mind. Keep the pad flat, use light pressure and keep it moving.

Why Drivers Choose Gloss Boss Max™

More control for first-time users, with the performance and flexibility enthusiasts expect.

🪞

Deeper Gloss, Clearer Reflection

Helps reduce fine swirls, dull haze and light oxidation when paired with a suitable pad and product.

🌀

9mm Dual Action

Spreads contact and helps reduce localised heat build-up for more forgiving control.

🔋

Choose 1 Or 2 Batteries

Start with one 21V Max 2.0Ah battery or add a ready spare for only £5 more.

🎛️

8 Digital Speed Levels

A clear illuminated display gives finer control from gentle waxing to stronger correction.

🧰

16-Piece Pad & Prep Set

2 flat foam, 2 wave foam, 1 wool disc, 4 cloth bonnets, 2 fluffy finishing bonnets and 5 sanding discs.

🚚

Shipped From The UK

Free tracked UK delivery, dispatched within 24 hours and backed by our 30-day promise.

From Dull To Deep Gloss

Light swirls and haze can hide the colour underneath. Use a suitable pad and product; results vary with paint condition and technique.

Before
After
Before
After

Complete your Gloss Boss setup

Everything that works with it, in one place.

Add the HydroJet or replacement pads and 10% comes off your order automatically at checkout.

Gloss Boss Max™ Or The Original?

Both are beginner-friendly dual-action polishers. Choose the setup that matters most to you.

Gloss Boss Max™ Gloss Boss™ Pro detail By hand
Power and control 380W · 8 digital levels 6-speed dial Professional equipment Manual only
Beginner-friendly motion ✔ 9mm dual action ✔ Dual action ✔ Operator controlled ✔
Light swirl and haze reduction ✔ With suitable product ✔ With suitable product ✔ Limited
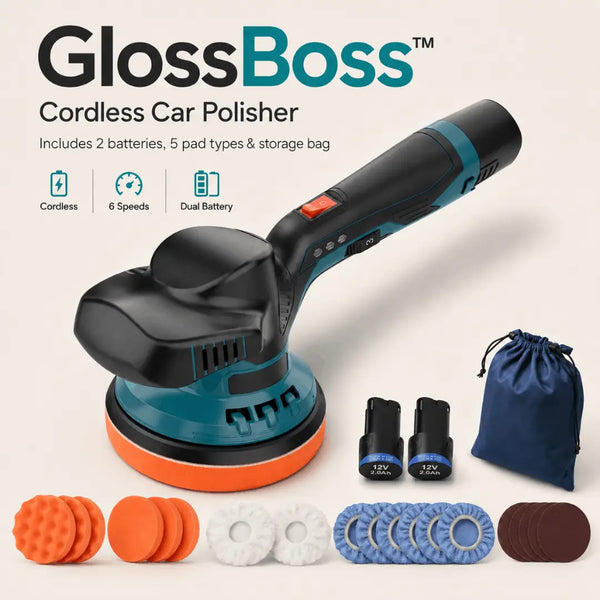
Battery setup Choose 1 or 2 × 21V 2 × 12V included n/a n/a
Tool weight Approx. 1.2kg Approx. 1.8kg Varies No tool
Included accessories 16-piece pad & prep set 16 pads + storage bag n/a Buy separately
Digital display ✔ 8 levels + battery status ✘ Dial only Varies ✘
Cost From £44.99 £44.99 £100+ each visit Your time
Gloss Boss Max™ 380W · 8 digital levels
Gloss Boss™ 6-speed dial
Pro detail Professional equipment
By hand Manual only
Gloss Boss Max™ ✔ 9mm dual action
Gloss Boss™ ✔ Dual action
Pro detail ✔ Operator controlled
By hand ✔
Gloss Boss Max™ ✔ With suitable product
Gloss Boss™ ✔ With suitable product
Pro detail ✔
By hand Limited
Gloss Boss Max™ Choose 1 or 2 × 21V
Gloss Boss™ 2 × 12V included
Pro detail n/a
By hand n/a
Gloss Boss Max™ Approx. 1.2kg
Gloss Boss™ Approx. 1.8kg
Pro detail Varies
By hand No tool
Gloss Boss Max™ 16-piece pad & prep set
Gloss Boss™ 16 pads + storage bag
Pro detail n/a
By hand Buy separately
Gloss Boss Max™ ✔ 8 levels + battery status
Gloss Boss™ ✘ Dial only
Pro detail Varies
By hand ✘
Gloss Boss Max™ From £44.99
Gloss Boss™ £44.99
Pro detail £100+ each visit
By hand Your time
Choose Gloss Boss Max™ for the 21V Max platform, eight digital levels, 9mm orbit and lighter housing. Choose the original Gloss Boss™ for two included 12V batteries at £44.99.

Your Questions, Answered!

Collapsible content

Will it work on my car?

It is designed for normal clear-coated automotive paint in good condition. Always work on clean, cool paint, start with the least aggressive pad and product, and test a small hidden area first.

I have never polished a car. Can I really do this?

Yes. The 9mm dual action rotates and oscillates, helping spread contact and localised heat more widely than a straight-axis rotary. Start on a low level, keep the pad flat and moving, and use light pressure.

What can it actually remove?

With a suitable compound or polish it can help reduce light swirls, water spots, oxidation, dull haze and shallow clear-coat marks. It will not repair stone chips, dents or deep scratches that catch a fingernail or pass through the paint.

How long does a battery last?

Each 21V Max 2.0Ah battery provides up to approximately 60 minutes of use and takes around 30–50 minutes to recharge. Runtime varies with speed, pressure and surface condition. Choose one battery or the two-battery kit for a ready spare.

Will I damage my paint?

The dual-action movement is designed to reduce localised heat build-up and make control more forgiving, but technique still matters. Work on cool, clean paint; keep the pad flat and moving; use light pressure; and test first.

What is in the box?

The polisher, your chosen one- or two-battery kit and UK charger, plus the 16-piece pad and prep set:

  • 2 orange flat foam pads
  • 2 orange wave foam pads
  • 1 white wool disc with black backing
  • 4 cloth waxing bonnets (2 blue, 2 smooth white)
  • 2 fluffy white finishing bonnets
  • 5 brown sanding discs for specialist surface preparation

Can I use it on anything else?

It can also be used on suitable boat surfaces, cloudy headlights, metal, wood and other compatible finishes when you choose the correct pad and product. Check the surface manufacturer’s guidance first.

How is Max different from the original Gloss Boss™?

Gloss Boss Max™ uses a 21V Max battery platform, a 380W motor, eight digital speed levels, a 9mm orbit and an approximately 1.2kg housing. The original Gloss Boss™ uses two included 12V batteries and a six-speed dial. Max is the higher-control upgrade; the original remains the value choice if two batteries at £44.99 matter most.

How fast is delivery?

We dispatch from the UK within 24 hours, so it is usually with you in two to four working days. No month long wait from overseas.

What if I do not get on with it?

You have our 30-day satisfaction guarantee. Use it, and if you are not thrilled with how your paint looks, send it back for a full refund.

Dispatched within 24 hours

Free UK delivery

30-day satisfaction guarantee

Dispatched within 24 hours

Free UK delivery

30-day satisfaction guarantee

Dispatched within 24 hours

Free UK delivery

30-day satisfaction guarantee

Dispatched within 24 hours

Free UK delivery

30-day satisfaction guarantee

Dispatched within 24 hours

Free UK delivery

30-day satisfaction guarantee

Dispatched within 24 hours

Free UK delivery

30-day satisfaction guarantee

Dispatched within 24 hours

Free UK delivery

30-day satisfaction guarantee

Dispatched within 24 hours

Free UK delivery

30-day satisfaction guarantee

Dispatched within 24 hours

Free UK delivery

30-day satisfaction guarantee

Dispatched within 24 hours

Free UK delivery

30-day satisfaction guarantee

Dispatched within 24 hours

Free UK delivery

30-day satisfaction guarantee

Dispatched within 24 hours

Free UK delivery

30-day satisfaction guarantee